Importing custom data in D365 Data Entities
Every organization has custom data that is specific to their operations/process.
Most organizations see tremendous value in bringing over that data to work with your enterprise software system either interactively for transactions or use for reports/dashboards.
Microsoft Dynamics 365 Finance and Operations has provided a Data Management Framework (DMF), that allows for the D365 system to be that one fully-integrated & all-encompassing system.
We will walk through Data Management Framework of Dynamics 365 Finance & Operations.
Data Management & Data Entity
Data Management Framework of Microsoft Dynamics 365 for Finance and Operations utilizes data entities in
- Data migration
- Copy module setups and configurations
- Integrations
In this example, we will see how data is imported through Data entity from an Excel file.

Sample Scenario
D365 Finance & Operations allows for adding fields to existing Data entities, so most custom data can be included within that entity. For the sake of explaining the programming concept, we will create a new entity which is related to the existing master data entity, say Customer.
There are many scenarios where users bring data from external systems and import into D365 on a daily/weekly basis.
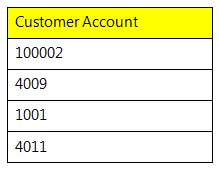
The user will make a list of customer accounts available, in an excel file, and then import that file in Dynamics 365 for Finance and Operations using the Data management workspace through a Data Entity.
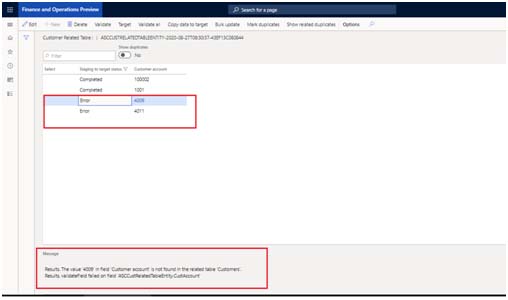
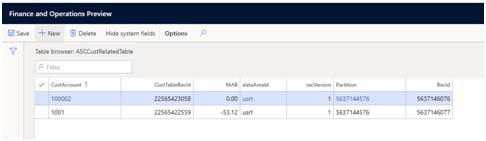
During the import, the system will find the related record of customer account in Customer master and store its record Id (CustTable.RecId) into a new table ASCCustRelatedTable as well as monthly account balance (and any other custom data fields). In case of any exception, user would able to view the error or warning details in the log of the Data management module.
Building the solution
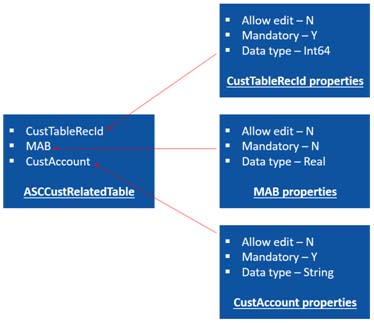
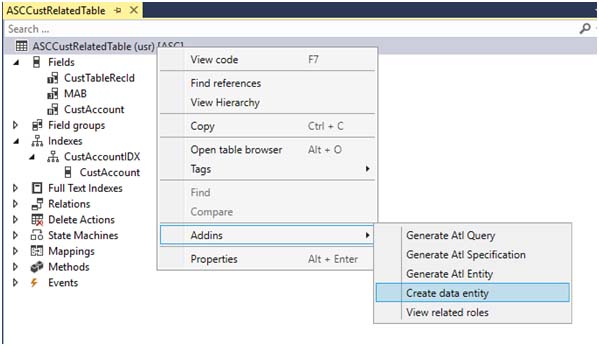
First, we will create a table ASCCustRelatedTable with all the required fields and index where we store the values of CustTable.RecId during the time of import from excel. In our case, we have fields and index as mentioned here
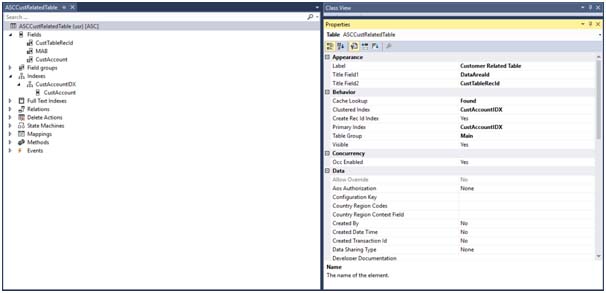
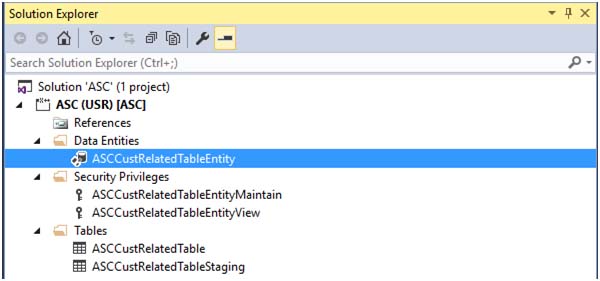
After creating the table ASCCustRelatedTable, we would be creating a data entity. For this we must right click on the table and go to Add-ins, then click on Create data entity. By doing this, new data entity ASCCustRelatedTableEntityalong with some dependent security privilege objects.
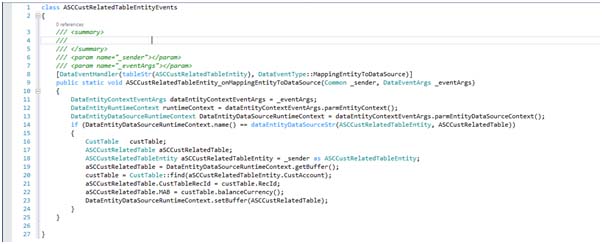
The user will only import an excel file that contains a list of customer account, but we require to store the record Id of Customer master(CustTable.RecId) into a separate table ASCCustRelatedTable as well as monthly account balance.
To achieve this, we must create a new class ASCCustRelatedTableEntityEvents and subscribe MappingEntityToDataSource event of data entity ASCCustRelatedTableEntity.
We would be initializing the value of CustTableRecId and MAB fields through this MappingEntityToDataSourceevent which would be executed during the time of excel import.
Here is how the assignment would be
CustTableRecId = CustTable.RecId
MAB = CustTable.BalanceCurrency()
We can change and utilize the event as per your need and business scenarios.
After all these steps, we should build and synchronize our Visual Studio solution.
Testing
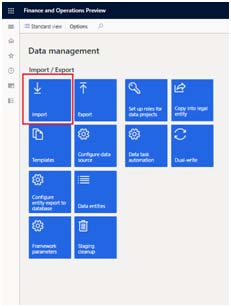
Log in to your Microsoft Dynamics 365 for Finance and Operations environment & open the workspace Data management. Click on Import, choose the data entity ASCCustRelatedTableEntity and add your source excel file with the list of customers.
This is how the import project looks
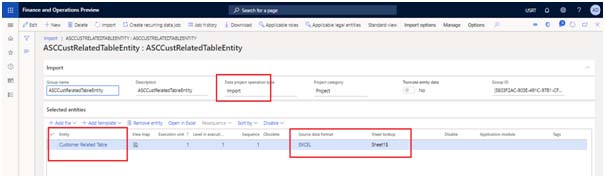
Click on Import in the action pane and records will get inserted into the table ASCCustRelatedTable along with the field CustTableRecId and MAB.
In case of an error, we can refer the log.